Tuesday, December 2, 2014

Season Wrapup

Well, as 2014 is drawing to a close we have a few pics to talk about.

This is one of our beds of tomato plants after the first damaging frost in early October.  Although there were still plenty of tomatoes, they tasted bad / spoiled after the frost hit when they were fine the day before.  It is a reminder that the weather doesn't always work with our schedule and we need to be proactive to get things done before it is too late...


Most of our peppers didn't turn colors this year, mainly due to a cooler summer.  We strung up jalapeno and some chili peppers to dry in front of our glass slider.  Although we started with mostly green ones, they began to turn red over time as they dried.  The chili peppers are mostly dried now, but the jalapeno (shown below) are still squishy as there is more moisture in their skin.


Last year the blueberry bushes didn't get protected and the rabbits feasted on them all winter long.  As the snow deepened they were able to munch higher and higher and at one point some of the plants were completely covered.  Part of good stewardship is using things you already have instead of buying new.  So instead of buying new fence material, I simply used the side panels from the raised beds and constructed a 3 panel or 4 panel cage depending on the size of the bush.


To hold the panels in place, I simply cut a small piece of wire to twist together and hold the panels.


This is a muskmelon that was sitting on the mulch as it grew.  This provided a nice feast for various insects as they munched on the melon from the bottom up.  We are thinking to use an inverted paper plate holder to keep the melons off the ground in the future.


This is a cabbage with a strange issue where it looks like the head rotted away from the inside.  Not sure if it was from insects or something else.  Other neighboring cabbages appeared fine.


Sometimes it seems like the problems in the garden are discouraging, and we are not getting good results.  Here is a sign Shannon made to help us be encouraged to press on.


Sunday, November 2, 2014

2014 Harvest


We wanted to share some pictures of our blessings harvested from our garden.

Abundance of peas

Due to the long cool spring, we harvested peas into July.  It was our best harvest since we started gardening here.  Another reason for our abundance was the process of chitting the seeds before planting.  For more information on this process, check out our blog entitled, "Chitting my peas".

Timothy's shelled peas

Icicle Radish (Diakon) and Detroit Dark Red Beets  

Putting up Swiss Chard is an easy process, just takes some time.  First go pick as much as you can carry of nice green leaves.  Shake off spiders, squish all caterpillars, remove any damaged parts of the leaves and soak in a sink full of cold water.  This will wash off any dirt and make the rest of the spiders head for higher ground where you can catch them and toss them back in the garden.

Armload of Swiss Chard

Mind the tree frog!

This little guy sat there quietly while I pulled leaves off the plant all around him.  It wasn't until I almost touched him that he twitched and startled me.  He was very tiny and so cute!  He stayed while I ran to get the camera but later was gone.  I don't know where he lives but I enjoyed his visit.

Modern edible art sculpture

I strip the leaf part off the thick stem and blanch it.  I am left with the colorful stems of the rainbow chard to put in the compost.  It was so pretty I took a picture of it. Art Prize next year? However, in an effort to use the whole leaf, perhaps next time we can run the stems through the juicer.

All that chard shrinks down to nice neat bags ready to go in the freezer.

Red, black and golden raspberries

I had read several years ago that garlic is very easy to grow and as long as you have the right type for your area, you can buy garlic from the grocery store and plant it.  So I did.  I got several organically raised garlic bulbs from the store and one from an organic farmer at the local farmer's market.  I planted the largest cloves from my original selection the first year, and then from that harvest, again chose the largest cloves to replant.  This harvest is from cloves planted in the fall of 2013 and is the third generation, second year grown in our garden.  This is all from one garlic bulb.  Each of the cloves is the size of an entire store bought bulb.  The longer you replant the best cloves from your own saved garlic bulbs, the larger they can get along with greater acclamation to your particular soil and weather conditions.

Hardneck Garlic cloves from one bulb

Our cucumbers were very prolific this year.  Instead of planting the seeds in the ground, I started them in small pots which I think helped with germination.  After transplanting them and training them to climb up the fencing on the south end of the beds, they did very well.  We had several different varieties which produced at different times.  Also, our cucumbers seemed to like the cool conditions this spring and early summer and did not succumb to cucumber wilt as quickly as they have in past years.  Several of our friends also reported having a great cucumber year.  The tomatoes weren't as happy.

Zucchinis and cucumbers with a few tomatoes

I usually grow the onions around the perimeter of a bed with other plants on the inside of the ring.  This has worked okay for me in the past, but this year they did not grow as well overall.  We have several hypothesis of the what might have caused this problem.  Perhaps the cooler temperatures as mentioned before were a factor, as our daytime temps were in the low 70s and the nights often dropped into the 50s.  We had several varieties as well with some of them started from seed and others planted from sets.   The sets were planted around the shorter pepper plants and the seeded ones in the tomato bed which might have been shaded out to the point that they suffered.  Because of all the different factors, it is hard to know for sure what the main issue was.  Regardless, next year we will probably not plant onions in the shade of the giant tomato plants.

White and yellow onions ready for braiding

Day's harvest

My favorite tomato that we grew this year was a Purple Cherokee Heirloom tomato.  It split very easily but had big gorgeous deep reddish purple fruits with green striped tops and tasted wonderful.  I have in the past been disappointed with how our Brandywine tomatoes tasted but this one was everything I love in a great tasting tomato.  We made some excellent toasted cheese, lettuce and tomato sandwiches with it.  I will definitely grow this one again and try to save some seed next year.

Tomatoes!  

Lovely Food to eat

Cabbage brains

One key to having a good harvest is to grow a variety of crops and within those crops, grow several different kinds, because you never know how the weather conditions will affect the growing season from year to year.  While some of our crops did wonderfully, others did not overwhelm us.  I was hoping to be buried in tomatoes (24 plants) and peppers (18 plants), but sadly we didn't end up with enough to make as much salsa as we wanted.  So basically, don't put all your eggs in one basket, be grateful for what you do harvest and go to the farmer's market to get the rest!


Saturday, November 1, 2014

The Light

For the invisible things of him from the creation of the world are clearly seen, being understood by the things that are made, even his eternal power and deity; so that they are without excuse: (Rom 1:20)

Today's post is about light.  It is one of the things needed by all plants to grow.  In fact, some seeds won't even germinate without light.  It becomes quite obvious how new seedlings and young plants crave the light when grown near a window.

New Seedlings Reaching Toward the Light

These young purple hyacinth bean plants turn their leaves up toward the passing sun that shines through our sliding glass door.  Each leaf, in an effort to present the maximum surface area to the light, bends and turns itself to follow the sun's arc across the sky.  The leaves move continuously during the daylight hours to follow the sunlight.

Nature's Solar Panels

When the sun drops out of sight, the plant leaves become motionless, dropping down to their sides, waiting for the return of the sun.

Waiting for the sunrise

Scripture tells us that Yeshua (Jesus) is the light of the world.  Are we as anxious as these plants to turn towards Him?  To make Him our focus, even if that means doing what might be uncomfortable and needing to alter our course to follow the light?

Then spoke Jesus again unto them, saying, I am the light of the world: he that follows me shall not walk in darkness, but shall have the light of life. (John 8:12)

Thursday, July 24, 2014

Seasonal Growth

I am amazed at the amount of growth the garden plants can do in a season.  I took some pictures over time this year of our new bed (#11) from the vantage point of our deck to help you see the growth from new soil to lush overgrowth!  These new beds are becoming our favorites as they are taller so not so much bending over and no fences to take down and put back up.  Enjoy the pictures...

Soil First

From left to right:
Variegated Nasturtiums, Parsley, Rainbow Swiss Chard, Alyssum along the far side.
The right side mirrors the left.

Cilantro and 5 varieties of Basil were added, Borage (Center near side) and Marigolds.
Lettuce is starting to fill in on far right.

Fennel added right of Borage. On far right, Shannon let 2 unidentified "weeds" grow
which turned out to be a Datura with purple trumpet flowers.

Purple Hyacinth Bean growing nicely and the flowers are filling in on the far side.

Packed and ready for harvesting again.

Tuesday, June 17, 2014

CANI 2014

This blog's title is CANI which stands for Constant And Never-ending Improvement.  We borrowed this from John Kohler at GrowingYourGreens.com where you can find nearly 1000 home videos to help you be a better "beyond organic" garden.

We hope to have a CANI post each year, showing the new improvements we are applying to our garden. We have several items that we are trying this year to improve our garden.

The first new thing we did was move the plant starts to the greenhouse sooner than before and we potted up some of the tomato plants.  This resulted in larger, better looking plants early in the season.

Early start in the green house.
Happy Tomato Plants
Potted up Tomatoes

We also expanded or growing space by adding 2 new tall raised beds which we blogged about before.  We also doubled our rain water storage by adding two new blue rain barrels.  These aren't directly hooked up to the rain spouts but we can easily transfer the water from one set to the other via a garden hose and gravity.  We decided to do it this way as it made the barrels closer to the garden and setup was easier.

New Rain Barrel Setup

Another improvement was covering cabbage and kale with dear fence.  This is a fine, light weight plastic fence composed of 1/2 squares.  So far this has done great to keep out the cabbage whites as they are too big to get at the plants.  Another benefit is that wind doesn't affect this fencing like it does when we tried Remay cloth.  It isn't keeping out all the bugs as there is still some insect damage, so maybe we will need to try a finer mesh in the future.  One surprise we had was an Oriole bird somehow got under the deer fence!  It was a good thing that Shannon found it before the bird did any damage or got hurt and we were able to release it.

Protected Greens

Another improvement we have done this year is the application of Sea-90 as a soil and foliar fertilizer.   It takes one gallon per teaspoon and can be applied to leaves every 7 to 14 days according to the website.  I found it works good to let the mixture set for 24 hours or so so that the chlorine will dissipate and the salt will assimilate. We also plan to try some Boogie Brew compost tea later as a foliar spray fertilizer.

Gallon sprayer for foliar applications

The last thing to mention is the addition of a chlorine water filter as we run our drip system from the municipal water supply.  The inline garden hose filter that we are using simply screws onto the hose.  The filter is called "Boogie Blue water filter for Garden".  One thing to be aware of is that the filter will reduce your water pressure so I found the drip system was not dripping as much as without it.  I plan to make more watering zones when I get the DripWorks items for our new tall beds.  Another bonus was the addition of a water timer.  Simply turning the blue dial shown in the picture allows me to set the length of time I want it to run.  This makes it nice to be able to start the timer and not be worried about shutting it off later.

Water Filters and Timer
Let us know what you think about our improvements!  We would love to hear what your CANI goals are this year too. They don't have to be only garden related, CANI can apply to all areas of life.

Rainbow Chard

We transplanted 20 Rainbow Chard plants in our new tall raised beds filled with well cured compost.  Shannon started them from seed indoors so they got a head start. The leaves are probably the biggest we have seen in our garden, but this year they were plagued with leaf miners.  Looking them up online I learned that they can be larvae from a fly, moth, or beetle!  Here is a Wikipedia link for more info:  http://en.wikipedia.org/wiki/Leaf_miner

The eggs I found were white and tiny, very easy to miss.  For what it's worth here is a picture of the eggs.  They are laid in small clusters, spread in multiple spots on the leaf.  You can scratch the eggs off with your nail if you can find them.  I found most on the underside, but some were on the top.

Leaf Miner Eggs on Chard

This shows some of the leaf miner damage.  The larvae / worm eats out the middle of the leaf and it protected by a thin layer of leaf "skin" on the top and bottom.  You can squish the worms or rip out the affected spots.

Leaf Miner Damage on Chard

Here are some pictures of our bountiful harvest.

Shannon with Chard Harvest from new beds

Rainbow Chard

Friday, May 23, 2014

Chitting my peas

It sounds like I (Shannon) am doing something naughty to my peas, but I promise everything is perfectly innocent. Chitting is a method of putting seed between two pieces of damp absorbent paper to germinate before planting. I learned about this previously and decided to try it this year because of the cold spring.  I also had old seed that I wasn't sure was still viable. So I placed 30 seeds of each variety of peas on a damp square of paper towel labeled with its name. I then folded the paper towel over the seeds to hold them in place and put it in a zip-lock bag.
Neat packages of peas
Within a week almost all of the peas had germinated. The root, which looks like a little tail, is the first thing to emerge from the seed. I think that I could have planted them sooner than I did as these guys have their cotyledon leaves starting to emerge as well.
Sprouted Peas
 The garden beds were still covered with their winter coat of leaves and it had snowed the week before so the soil was quite cold. Seeds germinate at a temperature range specific to the plant. While the peas would not germinate well in the cold soil and may rot instead, once germinated they will grow in the chilly soil.  One thing to do different this fall is to shred the leaves before spreading on the beds as this would save having to remove them in the spring. This will help them break down faster and not make a matted mess.
Winter Bed
 I planted the peas on the north and south ends of five beds where they can climb the stationary fencing. Since they will be harvested before the other plants in the beds, shading will not be an issue.

Peas in the Bed
Growing Pea Plants

Monday, May 5, 2014

Building Tall Raised Beds

Last year we helped our neighbor replace the planks on their deck. In exchange for our help they gave us what we wanted of the old wood.  One of the projects we used the old wood for was a potting bench, which we talked about in an earlier post.  This spring we used all the remaining wood to construct two new tall raised beds.  The beds are 3 feet wide, 12 feet long and about 28 inches high.

Construction started on April 13.  The first thing to do was cut all the planks to size and assemble the 12 foot long walls. This was done in the garage so the rain was not a factor.  It actually snowed a few days later.
Construction Begins
Deck planks transformed into walls

Next we moved the sides one at a time to the back yard to assemble in place.  It would be too heavy to move the completed bed by hand.  Deck screws were used in the assembly.  We then stapled landscape fabric along the inside of the beds to help keep the soil from seeping out the cracks between planks.
Adding the Ends

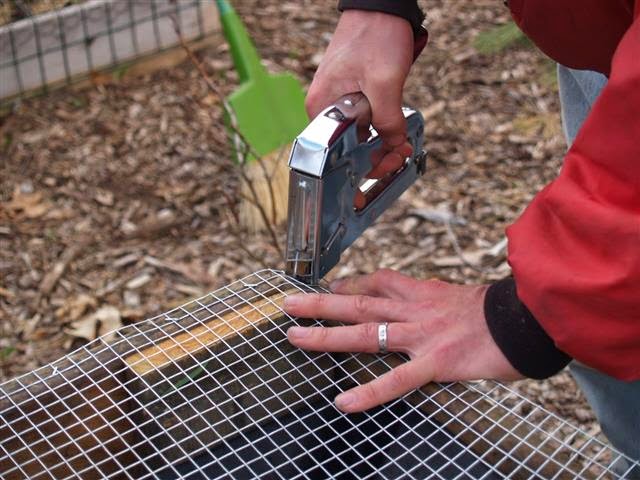
Because of mole / vole issues we decided to purchase some hardware cloth to put on the bottom of the beds.  It is much easier to do this before adding the dirt. :)  I rolled the beds over and stapled the hardware cloth to the bottom.  I was grateful that I made the beds 3 feet wide on the outside dimension and not on the inside dimension because then the 36" roll of hardware cloth fit nicely for stapling.  This is something to consider when constructing your own beds.
Stapling on the hardware cloth
Hardware Cloth on bottom, well top at the moment

Next came figuring out how much soil / compost we needed to fill the beds.  I used this website to calculate how many cubic yards I needed.   http://www.naturalgardeneraustin.com/cubic-yard-calculator.html

Because the bins were so high and to cut down on the amount of soil needed, we first filled the bottom with logs we had piled up previously. Some of which was from a tree that had fallen during a storm last winter. We then filled in the cracks with some wood chips we made previously when we borrowed a chipper to chip up some brush and pine trees we cleared to make room for some of the beds.  This wood in the bottom serves a dual purpose. To take up space and add nutrients back into the beds as they break down over time.  This technique is known as:  Hugelkultur.
Logs in the bottom to take up space and add nutrients
Wood-chip Filler

Thanks to IB Compost and our friend Tom who made 4 trips to haul 5.5 yards for us, we then filled the beds, one five gallon bucket at a time until they were full to the top.
Filler Up!

Here is the completed beds (May 4th) with some rainbow Swiss chard transplanted into it.  We plan to add more herbs and flowers soon.  Some nice things about having tall raised beds is not having to bend down as much to tend to them, being out of reach of bunnies, and having plenty of root zone space as compared to other containers.
Small Beginnings