Amaryllis are perhaps not quite as common as poinsettias in December but they are pretty close for being a winter plant purchase. While I understand that many people treat them as an annual or a cut flower and after blooming toss the bulb, my thought is this habit is simply for lack of information. I have two amaryllis bulbs that I am going to show you how I grow and keep over for the next blooming season.
To provide some additional information, I innocently googled amaryllis and quickly discovered that there is a dispute over the details of Sir Linnaeus’s nomenclature and a question of if the plant we are calling amaryllis today was the actual plant he was studying at the time he was naming plants. I wonder if they throw dirt clods at each other in these heated contests of naming a plant? In any case, amaryllis is the common name for the plant that I am speaking of and also the official Latin name of a completely different plant from a different continent (Africa). That would be a bulb plant that I also grow, however it is outside and whose common name is Naked Lady. Its leaves grow and die back before it blooms later in the summer.
Any how, the amaryllis’s Latin name is Hippeastrum, given to it by William Herbert, which means "Knight's-star-lily". Apparently no one knows why he gave it that name and dirt clods and confusion abound. And here you thought Latin was a dead boring language….
The details that actually matter to the care of this plant follow now. Amaryllis (common name will be used here on to prevent more confusion and airborne dirt clods) hail from South America and are tropical plants. Hence the reason they are grown indoors in North America. It is a bulb plant that grows its flower first and then the leaves. This is called hysteranthous. No quiz later, but don’t you feel smarter?
Ok, now onto fun stuff. One generally obtains a bulb in a box along with a peat block and a plastic pot, or if you are fancy (meaning more money invested) pre-potted and ready to grow. I, readily admitting to a tight fisted grip on the non-growing green stuff, purchased a box last year labeled Apple Blossom from a box store. It grew wonderfully for me and was beautiful. After flowering, I cut off the hollow flower stem and let it grow leaves. I then put it outside with the trees next to the greenhouse for the summer. I have to admit that I didn’t baby it much. It got watered occasionally, sat in full sun and pretty much got ignored.
 |
| Amaryllis, forced daffodils growing out the leaves, avocado tree, fig trees sitting outside the greenhouse in May. |
Later that year, I brought the pot in around September, cut off all its leaves, stopped watering it and put it in the dark furnace room. I marked the calendar to pull it out a couple of months later. Middle of December, our hardware store was running a special on amaryllis bulbs, $3.99 I believe, and I succumbed to another bulb. This time I chose a variety called Star of Holland which, according to the picture, has a white strip down the middle of each red petal. It too came in a box and the bulb was the same size that the Apple Blossom was when I purchased it the year before.
 |
| My two bulbs, the Apple Blossom on the left, its former pot and the newly purchased one on the right. |
I was impressed by how much the Apple Blossom had grown in a year’s time. A general rule of thumb for bulbs is the bigger the bulb, the bigger the flower display, whether that be in number of flowers, size of flowers or overall size of the plant. I pulled the Apple Blossom out of the pot and cleaned the soil off, pulled off the messy layers of dried skin and tried to untangle the roots a bit. I was very surprised by how root bound the bulb was as you can see in the photo. According to what I have read, they like to be root bound and the suggested size of pot is to be no larger than an inch or two more than the bulb. Apple Blossom was potted up into an eight inch pot while I put the new Star into the old six inch pot.
Upon inspection, the new Star bulb had some moldy fuzz on the bulb and all the roots were dried up and brittle. I cleaned it up and was a little worried if it would be ok. It looked a bit naked and the moldy spot was a bit soft. Next time open more boxes and look? I thought that I had found the best one there. Yes, I opened about 10 boxes and looked at the bulb inside before I bought this one.
 |
| Newly cleaned Star of Holland bulb… |
Next, into the pots they go. Amaryllis want to stand proud of the soil, 2/3 in and 1/3 out. They do not like to be too wet either. I use a potting mix with a bit of compost and some coir. I do not use the peat block that comes with it because I have found it is usually filled with soil gnats. They don’t do a lot of harm but they are very annoying and hard to get rid of. Think fruit flies for soil and you get the picture of little swarms of black insects everywhere.
 |
| 12 / 9 / 15 All potted and dressed up for display. |
I put moss collected from the woods around the bulbs to dress up the top a bit and added a little bling. Since these two pots are going to sit in front of the slider door part that we use to go in and out, I put them on a tray so they can be easily moved out of the way. They will get way too tall to sit on the plant rack so on the floor they go. Now I wait.
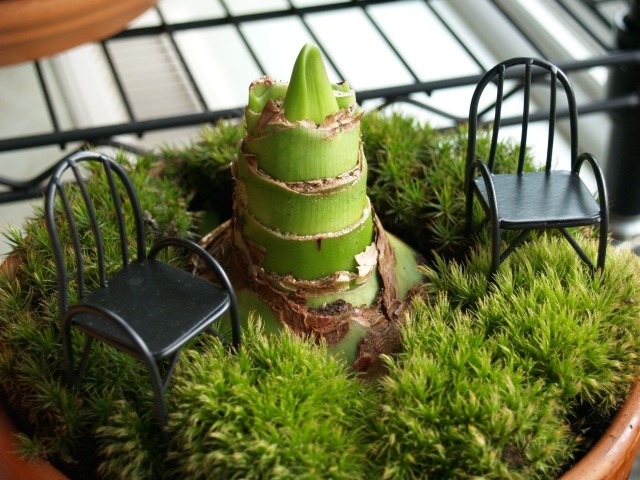 |
| 12 / 19 / 16 Added a couple of chairs to the pot… now I just need to find a miniature dog…. |
 |
| 12 / 19 / 15 A bit of bud showing on Star… |
 |
| 12 / 25 / 15 They are growing! |
 |
| 1 / 1 / 16 Growing very quickly now. I turn the pots almost daily to keep the stems straight. |
 |
| 1 / 9 / 16 A tad wiggly but going strong. The difference between the two bulb sizes is very evident here. |
 |
| 1 / 16 / 16 Two flowers opened with two buds yet to go. The Star has the beginning of flowers showing. |
 |
| 1 / 18 / 16 All four flowers are open on the Blossom and Star is showing color. It amazes me how fast this grows. |
 |
| 1 / 18 / 16 All the wiggly bits and pieces of the flower are just as interesting to me as its beauty. |
 |
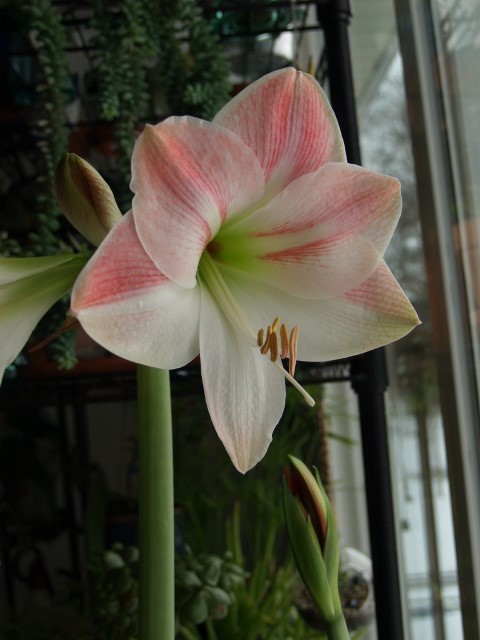
| A beautiful ALL red amaryllis…. |
It is pretty but NOT what the box said! Star of Holland has wide white stripes down the middle of the red tepals (an amaryllis flower is made up of 3 petals and 3 sepals which are collectively called tepals) and this one definitely does not have white on the inside. It does have some white on the outside of the sepals as shown below. When I expressed my dismay to T, he asked me if I was going to take it back. Well, no, of course not! But still!
 |
| 1 / 22 / 16 White on the outside, none on the inside. |
 |
| 1 / 22 / 16 So beautiful |
 |
| 1 / 23 / 16 I found T hunched over peering at the flower today and he pointed out the fact that the tepals look glittery, like they are covered with little crystals. |
 |
| 1 / 23 / 16 Final shot of my beautiful amaryllis…. For this blog at least. |
I am so happy with my Apple Blossom. A second flower stalk is growing so I will have another set of blooms soon. So my Star isn’t a star…. He shall be renamed Red. I guess this just gives me an excuse to buy another bulb next year. I’m thinking that amaryllis are like orchids… you can’t just have one!


T says: "Help, it's a jungle in here!"
ReplyDeleteS says: Just cleaning the air Lovey, just cleaning the air...
DeleteAny monkeys?
DeleteAhhh, the lovely amaryllis! Very nice blog & photos Shannon, I enjoyed reading every word of it, even though I couldn't pronounce many at the beginning.
ReplyDeleteThe little Paper White, that Mary had given all of us the Christmas of 2014, which I had stuck in the laundry room cabinet, after it had bloomed the winter of 2015, and then found just a month ago, dry & shriveled up, which I then watered and placed in the laundry room window, has lots of tall skinny leaves right now! I'm hoping for a bloom soon. Funny thing, and I have no idea where it came from, there was a stink bug crawling around on the leaves this morning, but has now disappeared this afternoon. Hmmm? Where could it have gone, and will it be back? Story to be continued!