Saturday, June 15, 2013

Garden "Lumberjack"

We found a felled potato plant.  After mourning its demise we examined the remaining plant and found another partially chewed stem.  It was obvious that a cutworm was in the vicinity.

Cutworm damage on potato plant.

Shannon hunted unsuccessfully for the cutworm in the mulch surrounding the plant for about 15 minutes before giving up and going on to another task on the long list of things to do.

Later, after coming in at dark and researching cutworms online, Timothy headed back outside in the dark, armed with a flashlight.  He returned victorious with the offender on the end of a stick.

Cutworm "kabob"

Cutworms hide during the day and come out at night to feed.  The link below has some helpful information on cutworms.  http://www1.extension.umn.edu/garden/insects/find/cutworms-in-home-gardens/

Ooooh Pretty...

This blog is to just show off my flowers.  We were blessed with rain later in the spring after quite a dry spell and my flowers appreciated it.

Perennial Garden

White Daffodil 

Red Bud tree in front of "big" pond.

Volunteer Tulips

Apple Tree Blossoms

Tulips by mailbox

Strawberry Field

Front circle garden

Irises 

Circle Garden

Ruby-Throated Hummingbird on Azalea 

Bunny who ate my cabbage... Grrrrr....

Circle Garden


Purple and White

Missing May

We completely missed blogging in May because we were busy in the garden.  Here is a quick overview of what we did...

Seeds lined up for the garden. Soaking seeds helps speed up germination.
Hardening off the flats.

After hardening of, the garden is now planted!  All the seeds are in, the tomatoes and peppers transplanted and the one last thing is the sweet potato slips that are coming next week.  The soil has to be warm enough for them or they will be extremely unhappy.

Our fencing did not keep out this subterranean invader!

We have had a terrible time with moles tunneling through and around our beds hunting our earthworms. In defense of our helpful earthworms, and our poor plants that get their roots removed in the tunneling process, we have declared war on moles.  Timothy was in the garden he noticed earthworms scattering on the surface of some moving wood chips.  After a moments contemplation he placed with great, deliberate force the heel of his boot on the moving chips.  The movement ceased.  Earthworms far and wide (at least those in a foot span) cheered.  However, the war is not over as there is new tunnels daily.

New and improved garden signs.

Our old signs were made with permanent paint-pen markers on white tiles.  While they looked fine, the weather slowly wore off the marker.  So Shannon painted the tiles with glass paint that you bake in the oven.  This should be a better lasting sign.

Sunday, June 2, 2013

HCG Buzz

Today we got to play with bees. The Holland Community Garden received a grant which allowed us to purchase and stock two bee hives as well as bee equipment.  We were invited to come participate in installing the two new hives.  While we both expected to just watch from afar and take pictures, there was an extra suit available for one of us to use. Timothy knew Shannon would be much more geeked to get up close and personal with the bees.  He graciously allowed me to be the astronaut.

Shannon sporting a bee suit.

The bees arrived in two nukes which hold 5 frames, a queen, drones, and worker bees. This is a good way to jump start a new hive as the queen has eggs and larvae in the frames as well as honey that the worker bees have made.

Two nukes full of bees
Master bee keeper preparing smoker to calm bees.
New frames for hives

We transferred the 5 frames into the new hives and added 3 more new frames to the base boxes.


Transferring a frame from nuke to hive.
Full hive with 8 frames in place

While we were being taught how to take out and replace frames, the bee keeper pointed out different aspects of the bee activity. One important thing was to find the queen and make sure she was alive and healthy as it is extremely easy to squish a bee. In fact, we unintentionally squished several bees every time we moved a frame.


Shannon holding a frame while the master bee keeper points out the queen.

Beautiful bees and their brood.

After all the frames were inside the hive the cover or roof was put on.  There are vents in the hive box on the top and a door at the base. The "door" is a piece of wood with different sized openings cut out of it so you can control how large the door is at different times of the year. In the winter the door is small because you want to conserve heat and not many bees are flying. In the summer the door is large to allow air circulation and room for many bees to enter and exit.


Putting on hive roof.
Transfer Complete

We are very excited to learn more about caring for and observing the bees. Someday Shannon hopes to have her own hive.

HCG Herb Garden

The other big project that I have been working on this spring is an over haul of the herb garden that was already in place at the Holland Community Garden.  It was planted several years ago and not much upkeep was done on it since.  Many of the plants were over grown and now unidentifiable.  Which kind of thyme is it or what is that were common questions I had as I sorted out the plants.  We also wanted to have room for annual herbs and replace many herbs that were bullied out by the aggressive ones that were left.

Previous Herb Garden

I completely removed everything with the help of several other volunteers and designed a garden that is more organized, accessible and is now an attractive feature of the garden.  We are still putting more plants in and as I raise and collect more herbs, the variety will increase as well. 

New Herb Garden Layout

NW Corner of Herb Garden

Center EW Path

The garden received 6 pieces of art from a local school that we could place at the garden.  My Herb garden design included 4 of these pieces.  The other 2 were placed in the perennial bed and the native plants beds, both of which I am renovating this summer.

Purple Chives and Yellow Sculpture

The final touches to this garden will be edging that we are hopefully getting donated, wood mulch to finish the paths and leaf mulch that will go on the beds.  Most of the plants are doing well despite not having access to water for several weeks because the garden’s well pump was out of commission for awhile, which is a whole other story.  I will post pictures as the garden grows.


Babysitting for the HCG

We are part of the Holland Community Garden where we have the title of  Principal Volunteers.  The difference between a principal and a regular volunteer is pretty much how much time you put into it.  Since we were upgraded this spring we have been very active in several projects for the garden. 

This year we helped with the tomatoes, peppers and egg plant grown for the garden by a local greenhouse.  Since we had a lot of cold nights this spring, we did not want to plant the garden with them until the night time temps were over 50 degrees.  The grower offered to put a growth retardant on them and keep them at the greenhouse but we decided to take them and baby-sit them for the two weeks until the warmer temperatures arrived. 

We divided the flats in half and put 6 trays per flat to spread out the plants and give them more room to grow.  So the original 21 flats now took up 42 flats worth of space.  Our little greenhouse had no hope of holding all that so our deck became flat central.  All the flats fit with little rows in between so I could get in and water with a watering can.  On sunny days, I watered twice a day.


Every night all the plants came inside and squatted in the living room.  The dogs had just enough room for their blanket, but not much else fit. One night we wanted to watch a movie and we had to climb over plants to get to the couch.  I do have to say though; they were very quiet and didn't make much fuss.


The last of them were planted yesterday so now we are finished with that baby-sitting job.


Saturday, June 1, 2013

Irrigation Update

Last summer we had a drought and we were watering by hand with watering cans for up to 6 hours at a time a couple of times a week.  While the plants loved the well water and I did have some nice biceps, it just took too much time away from other important tasks, like weeding so Timothy planned and purchased all the items needed to do irrigation.  Our blog post "The Water Plan" has the map. 

Unwinding the new irrigation tubes.
The sun was helpful to warm the plastic to "iron out" the coils
Mainline setup under the mulch.
Each bed is connected to the main line with a shutoff valve.
Constructing the bed emitter lines to the 1/2 tube header.
Completed irrigation setup in bed 3.
Added 2nd barrel to rain collection system.
We can now collect 110 gallons of rainwater with a potential to add more barrels if Shannon moves some of her hostas...  Currently we use this for filling watering cans to water various pots around the yard.  It could potentially be used in the drip-works system we have set up.

The Bench-mark of Stewardship

Our neighbor who knows that we like to recycle everything asked us if we were interested in their old deck boards that they were replacing on their deck.  “Sure”, I said, and then went to inform Timothy.  Well, of course we ended up helping remove and replace their deck and we got a big pile of 16 foot boards with screws still embedded. 

So, more work for Timothy but he tackled it gracefully as well as my list of wants that I wanted to have made from the boards.  First up was a potting bench, something I have wanted for years but we just never got around to making or getting.  I of course went online and found a great potting bench…. the mansion of all potting benches and gleefully sent it to Timothy. 

Dream Potting Bench Plus 
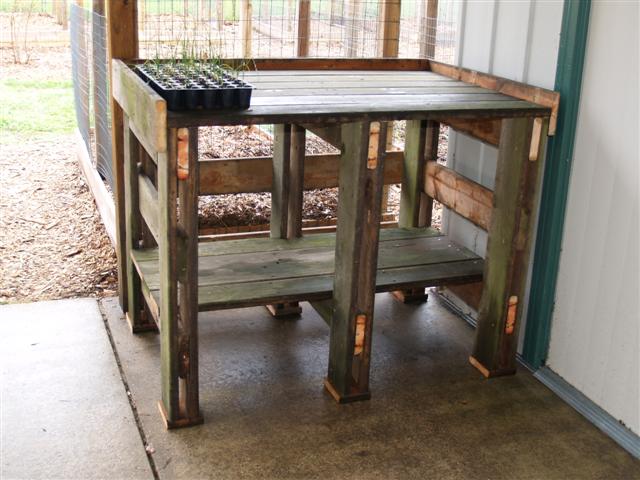
Uh… yeah, No.  So he drew up plans, I misplaced them, well I took the notebook he had drawn them in and turned the page to make a list, so he made the bench from memory.  This is how it turned out.

Homemade Potting Bench
Pretty great huh?  I thought so.  This bench is heavy!  Extremely sturdy, I can put my biggest pots, soil and plants on it and still tap dance on top and it won’t budge.  If we ever have a tornado come by, I think I will hide inside of it. 

 I am very happy with my bench, made with “free” wood.