Tuesday, February 28, 2012

Paper Pots

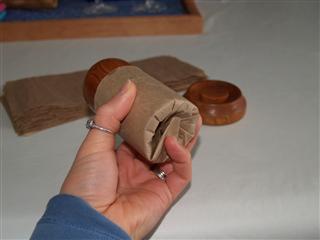
In today's post we will be showing you how to make paper pots.  This is a handy, inexpensive way to make lots of pots for our seedlings as they get bigger and need more leg room.  You can use newsprint paper or something of similar thickness.  We are using packing paper to avoid any news print contamination issues from the ink dyes.  That is an issue of debate for some as to whether or not the inks are toxic.  The pot making tool is made from wood.  We are blessed in that Timothy's brother is a wood worker and made the tool for us! :)  We have several pictures below outlining the simple process. Let us know if you like the idea and plan to try it yourself.  Enjoy!
Pot Making Tool

Paper cut to 10" by 4"
just the size needed to work well with the tool.

Wrap the 10" around the tool.

Fold the underside in.

Press and twist the tool together
to form a nice tight base.

Completed Paper Pot!

Just like factory work. :)

In creating the only hard thing is to begin; a grass blade is no easier to make than an oak.
    - James Russell Lowell

Sunday, February 26, 2012

Light Rack

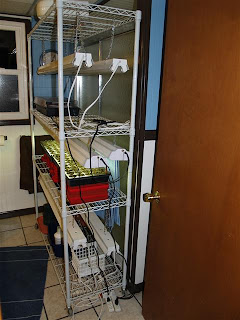
Home Made Light Rack
One of the things we do to give some crops enough time to grow and produce in our region from seed is to start them indoors.  While it is still too cold outside, we can start them inside where it is warmer.  It is important to have enough light for the plants to grow well.

We made our own relatively inexpensive light rack for this.  We purchase a wire rack ($40), some fluorescent shop lights ($10 each), wheels ($2 each), and a timer ($5).  The lights hang from the shelf above and the seedlings are placed in trays bellow.  It is important to keep the top of the plants a few inches from the light source.  To do this we have adjustable chains on the lights and some blocks to raise and lower the plants.  Sometimes one flat's plants are at a different height and thus we use both of the methods in order to keep everyone happy.  We are leaving the lights on for 12 hours a day.

Light Rack Front View

Shannon Transferring New Seedlings
From Seed Starting Tray to Potted Tray
Light Rack End View

Keeping the new plants watered properly is also very important. We don't want to let them dry out or stay too wet.  In past years we just used a spray bottle to keep them wet.  This year we are going to try to water from underneath.  Each tray is set inside of a flat. In the pictures you see two 50 cell trays of which we left on of the cells empty. We can periodically fill the empty cell until water just covers the bottom.  The soil will wick the water up into the cell, thus supplying water to the plants.  We also plan to add fish emulsion once a week as a fertilizer when we water as well.
Tray Water Holes For Watering From Below
Another new thing we are trying is the use of a heat mat.  Not sure how well this is going to work as there is a lot of insulating material (air and soil) between the heat mat and the seeds.  We are trying this on the pepper plants as they like a warmer soil temperature.  The Popsicle sticks are for labeling the different plants so we can keep track of what is where.

Pepper Seeds With Heat Mat

Wednesday, February 22, 2012

Waste not, Want not…


Growing veggies is one thing, utilizing them well is quite another.  The best way of course is to eat them the moment they are picked, but that is not always practical, especially because you wouldn't have anything to eat during the winter months.

This is another challenge to learn when it comes to gardening, how to use the produce you grow.  One of the reasons the stuff that comes in a box from the store isn't good for you is because of the preservatives.  These preservatives give the food a shelf life so that it will not go bad right away.  We just threw in our compost bin 3 formerly nice squash, 2 from our own garden last year and one from the local farmers market.  This waste is a lesson caused by the poor storage and not using them up before they started molding and oozing.  We had hung them up in hanging baskets (to allow for air flow) in our unheated garage.  The reason for the quick demise was freezing and thawing which accelerated their spoilage.

Ideally they would need to be stored in a controlled climate with constant temperature and humidity.  A root cellar of sorts is recommended.  We wanted them to be cooler than our basement but they would probably have faired better if left in the basement than in the garage.  I just looked up the recommend storage temp for winter squash which is 50F-55F.  The suggested length of storage is 2 to 6 months.  The relative humidity varied between the two sources I checked. One was 50 to 60%, the other 75 to 80%.  This year if we save some again we will need to try something else.

Monday, February 20, 2012

The Dreaded Squash Vine Borer

Have you ever been given a baseball bat sized zucchini?  It is supposed to be one of the easier and more prolific crops to grow.  We thought we should at least get something.  Our first year (2 years ago) we planted some zucchini and got a whopping 0 edible fruit from our plants.  The plants looked good at first but they soon got sickly looking and did not produce.  This was very discouraging, especially for Shannon as she is a "Master Gardener" who can't grow zucchini.  We determined after research and examination that the reason for the problem was due to what is called the "Squash Vine Borer".
Zucchini Trunk with Squash Vine Borer Exit Damage

By the second year we rotated our crops (subject for another posting) and tried again.  This time while watering we saw a suspicious looking bug hovering around the zucchini plants.  While I was watching it I saw it zero in on the main trunk of the plant.  The adult was actually a pretty black and orange moth which flies during the day.  This moth is very sinister and smart at the same time.  It typically goes to the main trunk of the plant where it's larvae can get the most nutrition, and cause the most damage.  If not caught in time it typically destroys the entire plant.  The egg is laid at the base of the trunk and after a few days the larvae will hatch and burrow to the inside of the zucchini plant, safe from pretenders and human eyes.  It can then safely munch away from the inside until time to exit and burrow in the ground for hibernation.  We were able to keep most of our plants safe last year.  We mulched heavy around the base to try and deter the moths and kept an eye out for them because now we new what to look for. Sorry the picture we took isn't the greatest, you can look it up on the internet to get a better look.
Adult Moth of Squash Vine Borer

Our zucchini crop still suffered last year though because we had another problem, powdery mildew.  This saps the energy and strength from the plants as well.  We tried a diluted vinegar spray on the leaves and it seemed to retard the mildew's progression but not destroy it.  At least we were able to harvest some fruit last year, but by no means were we overwhelmed with abundance despite having eight plants.

Zucchini with Powdery Mildew

 Shannon read that overhead sprinkling, getting the foliage wet, deters the mildew.  Something to try this year.

Saturday, February 18, 2012

Signs of Life

We are happy to share that the Parsley and Goji berry seeds are starting to come up!  It is a beautiful sun shiny day today, this makes the seeds happy and stretch forth toward the sun.  It has definitely been an odd winter this year.  Yesterday it was 40F outside yet there was snow gently falling from above.  Of course nothing stayed as it was well above freezing temperatures but it was interesting to see.

Below are some pics taken from the new seedlings in our seed starting tray.  You can see from the pictures a clear cover that fits over the tray and helps keep moisture in and provide a slightly warmer micro climate for the seeds to help them sprout.  Different seeds sprout better at different temps and take different lengths of time.  Most seeds do well at around 75F but spinach for example does best at around 50F.

Seed Start Tray On Plant Rack By Slider Glass

Cover Removed

Closeup of Seedlings Emerging

Friday, February 17, 2012

Stewardship


Part of what we are learning with the gardening is stewardship. Actually stewardship encompasses everything that we do and gardening is just a part of stewardship.  We understand from scripture that God Owns Everything.  He created everything and has given us many things for us to be good stewards of.  If we think of our possessions as His and that we are simply stewards of what He has blessed us with, it should cause us to take better care of what we “have” and to give thanks daily for our blessings.

There are many opportunities to practice stewardship when it comes to gardening.  It is a learning process and we are not perfect for sure but some of the areas we are exploring are: pest control (not just indiscriminately killing everything that moves but sorting out the good guys from the baddies), disease control (identifying the disease and learning the correct treatment that is best for us and the environment), reusing materials (using what we have or getting second hand items), composting (keeping organic waste out of the land fill while creating wonderful fertilizer), using space efficiently (considering sun, wind, soil, location and esthetics when placing garden beds), and finally growing from seed (ability to choose organic and heirloom varieties and encouraged to save seed).  Of course this is not an exhaustive list but it’s a place we have started.


We have done a Life Stewardship From a Biblical Perspective Presentation that you can view online.  The video presentation link is:  http://youtu.be/AMNzZiMGLyo

The supporting document web address is:  http://www.standardbearers.info/stewardship/


Thursday, February 16, 2012

Watering

An essential element for plants is getting the right amount of water.  Watering inconsistencies can stress the plants and cause undesired results like bolting, bitter fruit, and mold problems.

Our first year we watered from a garden house by hand, and used some drip hoses as well.  This was city water which contains chlorine to kill bacteria.  We have been filtering our water for many years to drink because we know it is better for us, so what about the plants we are watering then eventually eating?  I imagine there are some scientific studies done on this, but several years ago we did our own testing when we were deciding if we should get rid of our microwave or not.  We learned that the microwave affects the food it cooks. For the test we simply took 4 baggies with a few cotton balls in them, then took 4 types of water.  Filtered tap water, microwaved tap water, boiled tap water and plain tap water.  We soaked each bag's cotton balls with the different water and placed seeds on them.  The results were interesting.  The filtered water sprouted almost immediately, followed by the boiled several days later, then tap.  The microwaved seedling bag didn't really sprout at all for a very long time, and then while the other cotton balls else grew moldy it did not.  The sterilized tap water had no life.  The point relevant for this discussion is that the filtered water showed the best looking results for the sprouts. Filtering all our water before putting it on our garden is not practical with our little Berky water filter, but a couple of options for getting better water for our plants came to mind.  One option was to fill buckets and let the water set so the chlorine could off gas before putting the water on the garden.  If we did this we would need to be sure to not let the water set too long or cover the tops with a screen to deter mosquitoes.  Another possibility was to put in our own well since the water table was about 18 feet down, according to our neighbor behind us.  This seemed doable for us do-it-yourselfers.

Last year we put in our own well.  Turned out the water line was only about 10 feet down.  We live close to a lake and you can barley make it out through the trees in the winter when there are no leaves.  The well was actually quite simple and easy to install, just a couple of 10 foot pipes, a drive point, and a drive cap and in it went with a post driver, quite easy through the sand, the last little bit was harder but I was able to get to a good height for the hand pump and that was it.  Then came the pumping, and pumping, and pumping...  It takes a long time to water our 7 beds, even when we worked on it together.  Typically Timothy pumped and Shannon ran water back and forth in watering cans.  We have three 2 gallon watering cans to keep things moving.

Shannon Priming the Pump
We also added lots of mulch last year as we learned from "The Ruth Stout No Work Garden" book.  We used mainly hay from my father's barn.  This worked great to nearly eliminate the weeding and it was also to minimize the amount of watering needed because the mulch was to help keep the beds from drying out.  We probably didn't have the mulch thick enough because it still seemed like we needed to water a lot.  That might also be do to our sandy soil.  Last summer was cooler than usual and one issue with the mulch seemed to be that crops that like it hot didn't do very well.  Especially our eggplant which we tried for the first time last year and never got any edible food from it.  The mulch kept the soil cool and it never had a chance to warm up.  So this year we will look into keeping the mulch on thick for cooler crops and very light if at all on warmer crops after the soil has warmed.

Another thing I was pondering as I was pumping the water by hand was the thought that this cold water would be somewhat of a shock and potentially stunting to them.  Again for cooler loving crops like broccoli, lettuce and spinach this might be ideal because it will help cool them down in the hotter months and retard their bolting.  However the peppers and tomatoes were not happy.  So again I was faced with the possibility of an intermediate step of staging the water in buckets or a larger rain barrel of sorts.  This would then allow the water to be warm and to maximize the potential benefit to the plants.  We looked around for some rain barrels as this would hold much more water than a 5 gallon bucket and not be so messy looking with buckets all over.  We found the typical price in the store of around $100 or more to be ridiculous for a 50 gallon plastic rain barrel.  If you are interested in a barrel for yourself and don't mind looking around and doing a little work to put in a spigot, you can find a much better deal.  I was able to get a used barrel through a farmer and put in my own spigot for under $10.  We also put up rain gutters last year so now the potential for collecting the rain water is there as well.  My plan this year is to hook up one or possibly 2 barrels by the rain gutter and use this as another water source.

"Rain" Barrels
Why do hand watering instead of automatic?  Well there could be benefits to either depending on your situation.  As the plan for our official vegetable garden this year will be ten 4x8 raised beds, it is still a reasonably small enough amount of space.  If we had much more garden space, another method would be preferred.  But who knows, I might change my mind this year as I am pumping, and pumping and pumping... One major benefit of watering by hand is that you will be spending more time in your garden than if you simply turned on the sprinkler.  This allows one to notice the needs of the plants sooner to allow for more timely intervention.  You notice the pests, crowding issues, and you can test those sweet peas to see if they are ready yet.  Another benefit, is if there isn't electricity for what ever reason, you can still water without any holdups.  Although I am sure there will be other major issues we will need to deal with if that happens, but watering won't be one of them. :)

Another purchase, which was just delivered today, that I am excited to try out this year, is a new hand water pump.  The new pump I got is supposed to be durable and long lasting, no leather to replace.  The specs say up to 10 gallons a minute, but I am mounting the 2" intake on my 1-1/4" pipe so I am not expecting that much but am hoping for better output.  Another benefit is that it is supposed to be able to work in a pressurized system.  My thought is to hook up a garden hose to the output, as it accepts a PVC connection which I could not do on my old picture pump, then filling the rain barrels when it's the dry season, this will require pumping up hill.  Then when it comes time to water the garden, just hook a garden hose to the rain barrel and we should be good to go.  Well that's the plan at this point.  We'll let you know how it goes.

Our New Hand Pump - From OasisPumps.com

Monday, February 13, 2012

In the beginning there was a sand dune...

Our friendly grandmotherly neighbor who lived behind us like to tell the story of how her children who are older than we are use to play on the sand dune. They and all of the neighborhood children were very disappointed when what is now our house was built on their play lot. We discovered, under the top soil / fill dirt which ranged from non existent to six inches in depth, beautiful beach sand. To say our drainage is sharp is an understatement. Several years ago we received 14 inches of rain in less than two days and the only puddle was in the middle of the asphalt cul-de-sac.

Original Backyard
So what does one do with beach sand? Well we built a volleyball court and did not have to bring in any sand.  That lasted a few years but now even that is being taken over with gardening priorities. Our new "greenhouse" now resides in the former, seldom used volleyball court.

Greenhouse in former VB court
Our lot is not huge nor extremely fertile, but we are determined to grow something. At least the dune grass is happy.


Sunday, February 12, 2012

Timing

As much as we would like repeatable, predictable results in our gardening I am finding it to be more of an art than a science.  There are so many factors that come into play where timing is concerned like: air temperature, soil temperature, rain / water frequency and amount, water and soil quality, sunlight hours, shading, pests and disease, and beneficial bugs to name some of them.  And of course the quality of the seeds we start with and how old they are directly affect when and if the countdown even starts.  Seeds from various crops have different shelf lives and how they are stored is a factor as well in germination viability.

So, how does one know when to start seeds, when to transplant, and when to harvest?  It takes research, dedication, trial and error, and hopefully eventual experience.  We are grateful to have the information from others that helps us know when to do these things, but it still takes wisdom on our part to watch our plants and weigh the affect of factors such as mentioned above.  There is a lot of grace thankfully that God has built into the timing so that we can still have success even if we are not perfect.  Just like how He gives us grace when we mess up because we are not perfect.

We do know that timing is important and if we are too late with planting for example, we will never harvest any fruit before winter sets in.  There can be a lot of things to keep track of, especially if we have several different crops we are planting.  So, how do we keep track of all of this?  Well, we started with a good resource like Mel Bartholomew's "All New Square Foot Gardening" book which has some very nice charts that help us determine what to do when with various crops.  This was a good place to start, but to use the charts correctly we still have to do manual calculations to determine all the various dates to come up with an actual time frame to do something.

So what does a computer programmer do when things are slow at work?  He writes a program that he, and hopefully others, will be interested in.  After Timothy's boss OK'd the idea, and after several hours of learning a new programming language and operating system, Garden Time was born.  This is a program that runs on an android device and does all the tedious calculations for you to help you know when to sow, transplant, and harvest your crops once you enter your spring and fall frost dates.  There is a lite version available that lets you select a crop from the list and see its date information.  A paid version (only 99 cents) will also allow you to create your own personal list, and it will generate a to-do list based on the calculated dates so you can be sure to not miss a thing.  Click here to visit Garden Time on the Android Market if you are interested in checking this out.  The app picture was taken last year in our garden.  There are lots of ideas and expansion possibilities I could add to this program, like germination times and ideal temperatures, pests, diseases, treatments, fertilizers, recipes, general crop information and pictures, storage techniques etc.  So many possibilities but because it would take a lot of time and research to gather all the information and integrate it into the app, I am not making any promises. :)  Maybe someday.

View Our App on the Android Market

Friday, February 10, 2012

Underground Thugs

Winter is not done yet as it snowed again.  Today we will be exposing two of our recently discovered underground thugs.  We dug up carrots planted last year and found to our dismay damage from nematodes and carrot rust fly larvae. See pics bellow from our carrots.

Not knowing much about these thugs ourselves, we had to do some research and the following is some of what we found.

Nematodes or roundworms are diverse and are found all over the world. Root-Knot Nematodes infect some 2000 plants and they cause approximately 5% of global crop loss.  The larvae infect plant roots, causing the development of root-knot galls that drain the plant's energy and nutrients. They are tiny, microscopic actually.  Ways of control include chemicals, crop rotation, cover crops, and biological control.
Root Nematode Damage

Carrot Rust Fly larvae feed on the root of the carrot.  Foliage becomes wilted and discolored and rusty brown tunnels are seen in the root.  The flies lay their eggs around the developing carrots, the larvae, once hatched, burrow into the root.  Because female carrot flies are low flying, the best method of prevention is to erect a barrier at least 2 feet high.  Other control methods include using row covers, or planting rosemary, sage, and marigolds.  Some newer varieties of carrot claim to be resistant.
Carrot Rust Fly Damage and Larvae (Blue Arrow)

Thursday, February 9, 2012

The Campau-sters

Shannon started the Parsley and Goji berry seeds in the seed starting tray today but it is not much to look at, at this point.  Once they start coming to life we will get some pictures up.  We are using "Seeding & Potting Mix" from Planters' Pride which we purchased from the local Menards store.  We go there a lot for supplies.  It is important to have clean soil for starting seeds or you'll get all sorts of things sprouting up as we found out last year when we used soil from our compost bin that wasn't fully composted.  All sorts of interesting things came up along with the lettuce we planted, including peppers and marigolds!

I have lots of ideas for topics to discuss so I will just mention some of the things rolling around in my mind so it will help me to remember and give you all something to look forward to in future posts...  Crop timing, watering, raised beds, the "greenhouse", composting, mulching, lessons learned, the dreaded squash vine borer, goals etc... just to name a few.

For the remainder of this post though I wanted to explain the title.  Our last name, Campau, is French and is pronounced "compo" as in "composition" or "compost pile".  We have a compost bin outside that gets used a lot.  It is good stewardship of all the kitchen waste scraps (after our dogs have their share), and after it "composts" it is great to add back into the garden to add nutrients and beneficial earth worms and  micro organisms.  Look for a more in-depth post in the future on composting along with a pics.  The point is, when you see: "Posted by The Campau-sters" at the end of each post.  read:  "Posted by The Composters".

Blessings.

Wednesday, February 8, 2012

Looks like spring...


I feel like we should have planted some peas today.  It feels much more like March lately than February.  We have been having abnormally mild weather this winter with below average snow fall.  What little snow we’ve had doesn’t stay around for long.

Today we soaked parsley (Giant of Italy) and Goji berries in preparation for planting in the seed starting tray tomorrow.  Parsley takes a long time to germinate from what we understand and we want to have a couple of pots for bitter herbs at Passover.  After storing the seeds in the refrigerator, a warm soaking is supposed to help speed along germination.  We are putting them in a seed starting tray which has long narrow strips.  We will post a picture soon.

Goji berries are originally from China and brought over to America with the immigrants, many of whom worked on the railroads.  This berry, which is full of antioxidants, is credited, along with their diet, for enabling the workers to survive despite the horrible working conditions. The Chinese workers completed more track faster than the other workers due to their work ethic and health. There are still Goji berry plants growing wild in Utah near the Salt Lake which are credited to the Chinese workers who planted them while in camps.

We purchased a bag of dried organic Goji berries and from those we are starting plants. They are hardy to zone 4 and appreciate alkaline soil. We will have to amend the ground where we plant them as our sand is generally acidic. Hopefully we will have some seeds germinate and in about 3 or 4 years perhaps harvest a few Goji berries. The bushes can reach 8 to 10 feet in height and width when they are happy so we will have to plan well where we put it. If the seeds don’t work we may have to purchase a plant.

Tuesday, February 7, 2012

Background

I (Shannon) am a master gardener of 7 years but a food plant grower for only a couple. I grew up with plants as my mom was always nursing the dying clearance plants from the store back to health and growing gardens on our beach sand lot. I learned a lot from her and have continued my education and expanded my plant horizons over the years. However my first love was always landscape (read flowers here) rather than "food"scape. I am finding that growing a green pepper can be much more difficult than growing my orchids. Even so I am enjoying finding new places to put food plants in my flower beds.

I (Timothy) remember helping in the garden as a child, holding the row stake line so my dad could mark the rows with a hoe. I remember being bitten by mosquitoes and hoping it would be over soon.  Now once again we are looking at growing vegetables  but this time in raised beds, not the huge garden with long rows like my younger years.  My desire is to keep things as natural and healthy as possible using natural / organic methods.  Being frustrated with the results thus far, I find the use of mass applications of pesticides and fungicides understandable to combat the evil bugs lurking everywhere, as well as keep the assortment of critters out of the garden and to combat the myriad of plant diseases.  Ugh!!

So what makes a dedicated flower gardener and a former child "slave" who was personally responsible for enabling the continuation of the mosquito species decide to pursue food gardening?  Uhhmmm.... That would be God's fault.  Oh wait, He's perfect, nothing is His fault, it is all part of His plan. Here are some reasons why we feel we are on this journey. This is for our health.  Fresh fruits and vegetables contain life. By growing our own food, we can choose the varieties (non GMO and heritage seeds which we can save), we can control the way it is grown (organically), and harvest to eating time (less nutrient loss).  Another reason we are learning how to garden is so we can teach others. Many in our society have wandered far from our agricultural roots and do not know what is involved in growing food and sadly what is healthy food.  We do not know the future and it is good to be prepared and able to provide for your family and neighbors in hard times.

We hope our woes and triumphs will be entertaining and inspiring. At minimum you can always learn what not to do.
Photo from Shannon's Flower Garden

Sunday, February 5, 2012

Greetings and Welcome...

Greetings and welcome to the Campau Garden Journey. My name is Timothy Campau and my wife is Shannon. We live in Holland Michigan with 2 dogs and no kids. The idea behind this blog is to help us keep track of what we have been doing with our city lot (primarily vegetable) garden and to hopefully help and inspire others with what to do, and more likely what not to do when it comes to our garden crops. This is actually the start of our third year pursuing vegetable gardening and we plan to have ten 4x8 raised beds this year. Look for other posts soon giving some of the highlights and pictures from our experience the past couple of years. We will be starting seeds again shortly and growing seedlings in our light rack. (Look for pictures soon.) We believe that God has led us to start vegetable gardening and to be good stewards of everything that he has given us. We want to do everything healthy and organic so we get the most value we can from our food. At this point we have not had very good success in what we have harvested but are continuing to look for better and more efficient ways to get the most out of our garden. We will be trying some new things and ideas to help warm the soil and jumpstart our crops as well as better protection from the critters and pests (including our dogs!) but more on that later.

Thanks for reading and God bless.